Your septic tank is the first stage of treatment for your wastewater after it leaves your home. It separates solids and liquids in wastewater and helps prevent pathogenic organisms from reaching shallow ground waters or surface waterways.
Heavy solid waste sinks to the bottom of your tank where bacteria begin to digest it. Oils and grease float to the top in a layer called scum. Click https://www.septictankarmadale.com.au/ to learn more.
All the sewage from the house drains into a large underground tank. It holds wastewater until bacteria decompose solid wastes, which settle to the bottom in a layer of sludge and oils and grease float to the top in a layer of scum. Wastewater passes between these layers through the outlet pipe. In a well-designed system, the liquid sewage leaves through an inlet baffle that forces it downward so it does not skim across the sludge and scum layer and exit untreated. The inlet baffle should have a screen or filter to block large particles.
The partially-treated wastewater leaves the septic tank through a distribution box and perforated pipes into an absorption field or leach field. The system may be conventional or a more advanced engineered system that removes more contaminants before dispersing the wastewater into soil.
A well-designed septic system should last about three to eight years before it needs to be pumped. During this time, homeowners should be cautious about flushing non-biodegradable materials down the toilets, such as paper towels, cotton balls and swabs, menstrual hygiene products, condoms, coffee grounds, pet wastes, cooking fats and oil, tissues, dental floss, plastics and bones. These can clog the septic tank and drainfield or interfere with the biological process, reducing the effectiveness of the septic system.
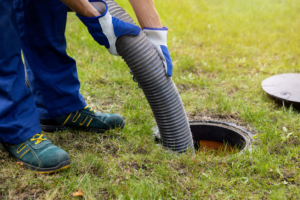
The septic tank also contains a large amount of liquid sewage, which should be pumped out occasionally to remove solids that have settled. If too much sludge and scum build up, the sewage may flow directly to the drainfield where it exposes people and animals to disease-causing organisms.
Overflow of the septic system or excessive water entering it can damage the tank, leach field and distribution box and create hazardous wastewater conditions. Excessive rain or rapid snow melt, high winter water tables and flooding can cause the septic system to back up.
It is important to map out the location of the septic system components and to use caution when doing yard work or construction near the tanks, leach field or distribution box. The tank, leach field and other system components should be kept clear of vehicles, play structures, sheds, pools or any other structure that could damage them. This will prevent the destruction of the absorption field and avoid septic tank failure and expensive repairs.
The Drain Field
A septic tank’s job is to collect, store and treat waste from your home. Once the solid waste has been deposited in the tank, it undergoes natural digestion with bacteria inside the tank to make it safe for wastewater discharge into the drain field. The resulting liquid is called effluent.
Heavier materials such as feces and toilet paper fall to the bottom of the septic tank where they form a layer of sludge. Lighter materials such as soaps, oils and grease float to the top of the tank. This layer is known as scum. Bacteria break down the sludge and scum layers to leave only clean wastewater in the middle of the septic tank, referred to as the liquid layer, which exits the septic tank into the drainage field.
The drain field is an underground system of perforated pipes in gravel-filled trenches where the effluent is absorbed into soil. When the effluent percolates through the soil, harmful bacteria and excessive nutrients are naturally filtered out of the water. The remaining wastewater is then absorbed into the groundwater supply.
Properly operating and maintained septic systems should not experience problems with the drain field. But, if you notice a foul odor near the drain field, wet or soggy areas in or around the drain field or slow to drain kitchen and bathroom drains, there is likely an issue with the drain field.
If a problem occurs, you may need to have the drain field repaired or replaced. A professional can determine if your drain field has reached the end of its life and, if necessary, design a new drain field for your property.
Some common drain field problems are:
Avoid putting anything into your drainfield that could cause it to clog. This includes putting anything into your septic tank that doesn’t belong there (cigarettes, facial tissues and paper towels, paper towel rolls and kitchen garbage).
Keep children and pets away from the drain field. They may try to dig in or play on the pipes and disrupt the bacterial digestion process. Plant only grass or shallow-rooted plants over the drainfield area to prevent root intrusion into the pipes. Divert surface water runoff from roofs and downspouts to areas away from the drainfield. Avoid placing driveways, parking lots and other hard surfaces over the drainfield area to reduce surface water seepage that could overload the system.
The Riser and Lid
The riser is a simple device that connects to the top of your septic tank. It extends the height of the lid from ground level to just above the surface of your lawn, making it easier for septic tank pumpers to access the tank and for homeowners to perform routine septic tank inspections. The riser can be made from a variety of materials, such as concrete or high-density polyethylene (HDPE), and is designed to withstand the harsh underground environment. It also comes with a durable, watertight lid that prevents odors, gases, and moisture from escaping, while keeping pests and debris out of the septic tank.
A septic tank riser is a valuable investment that will help reduce the time and cost of septic system maintenance. It eliminates the need to dig up your yard and minimizes the risk of damage to your property, while also reducing the amount of chemicals that leach from the septic tank into the surrounding soil and groundwater.
Septic risers also make routine septic tank inspections more convenient by making it easy for homeowners to lift the lid and see inside the septic tank. This can quickly identify issues such as a full septic tank, slow draining pipes, or other problems that may require a septic pumping company.
When installing a septic tank riser, it is important to carefully consider the positioning of the lid openings. It is best to have one large opening over the septic tank inlet and another smaller opening for the drainfield or pump chamber. This helps to provide a balanced and efficient septic system.
It is also important to determine the size of your septic tank before purchasing your riser kit. It is critical that the riser and lid are sized correctly to ensure a tight seal. To do this, measure the height from the ground to the top of your septic tank’s lid and then purchase an adapter and risers that are slightly larger in height.
Once the septic tank riser is in place, the next step is to install the secure, watertight lid. It is best to wait until your septic tank is scheduled for its next pumping before installing the lid to avoid a potential tripping hazard.
The Pump
A septic system is a way to treat wastewater for homes that aren’t connected to a municipal sewer. Basically, it’s one big underground tank that collects sewage and wastewater from bathrooms, showers, and other household drains. This allows the homeowner to safely dispose of waste outside of the home rather than risk contamination with groundwater or surface water sources.
As wastewater enters the septic tank, it settles and separates into layers. The heavier masses (such as solid waste, fats, oils and glycerol) sink to the bottom of the tank forming a layer of sludge. The lighter masses float to the top of the wastewater forming a layer of scum.
Bacteria in the septic tank digest these layers and separate solid matter from the liquid wastewater. This is known as decantation. The resulting ‘effluent’ is released into the drain field area where natural soils provide further treatment and filtering of the sewage and wastewater.
Most conventional septic systems consist of a septic tank, distribution box and drainfield. Some areas – especially those with sensitive soils – may require more advanced systems that remove more contaminants before dispersing wastewater into the soil.
Once the wastewater leaves the septic tank it travels down a pipe to the drain field area. Here it is slowly absorbed into the soil by microbes that live in the surrounding soil. Eventually, the bacteria and other pollutants are broken down into carbon dioxide, water and other naturally occurring substances that can be safely absorbed into the soil.
The septic tank itself is usually rectangular or round and made of fiberglass, polymers, or concrete. It has a lid that’s sealed to the riser and a T-shaped outlet. A baffle or ‘distribution box’ sits on the bottom of the tank to prevent sludge and scum from exiting the septic tank into the drain field.
A septic tank also has a vent that opens to the outside air to release gases generated by the bacteria as they break down the sewage. These gases can include hydrogen sulfide, which smells much like rotten eggs. The vent is fitted with a filter to reduce these odors.